
Snowflake Socks
I'm working up a sample of the Snowflake Socks that I designed for Interweave Knits Fall '07 for the class I'm teaching at Close Knit, and I thought I'd take the opportunity to give some hints to those of you working the pattern. I've got guidance on how to increase the size and also some tips for working the gusset and heel flap. They are general directions and not specifics to avoid any copyright troubles, and the sizing suggestions haven't been tested, so take them with a grain of salt (and let me know if I made any grievous errors so I can fix them).
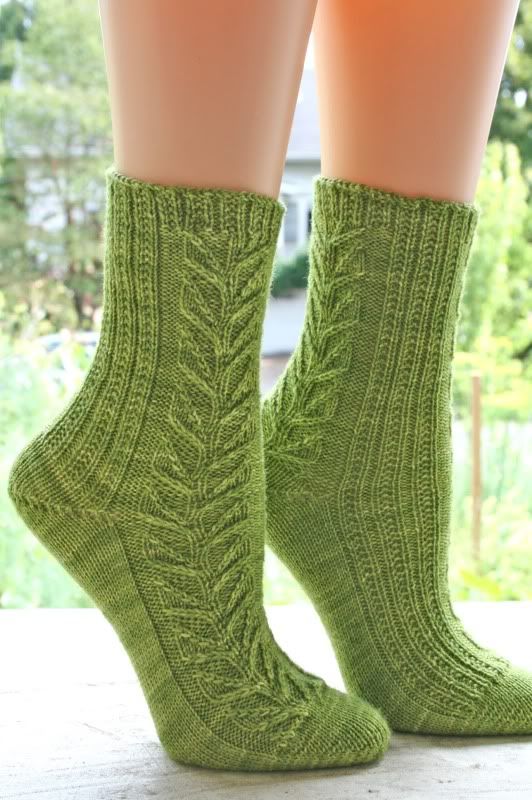
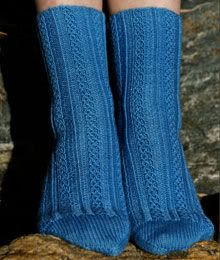
I'm using Louet Gems Sport in a dark purple and light grey, and it is turning out just lovely. Here it is, graciously modeled by my little plastic foot:

And the back view:

I've seen a few comments floating around from folks who want to resize the pattern to fit a larger foot. The best way to do this would be to add additional stripes on the sides of the leg. Add eight stitches to the cast-on to increase the finished foot size to 8.25" (which would be the right size for 9-9.5" feet) and then repeat the first couple stitches of the chart an additional two times on each side of the pattern. For example, right now the stripes are W-B-W (white-blue-white) on either side of the leg, and this is represented on the chart with sts 1 & 2 as B-W and stitch 28 as W. You'd modify so that the stripes would be W-B-W-B-W-B-W on either side of the leg so the chart would change to cover 32 sts and you'd knit sts 1-4 as B-W-B-W, work sts 3-27 of the chart as written over sts 5-29 on the needles, then work W-B-W at the end.
When you get to the heel, you'd work it over 33 sts. When turning the heel, k17 on Row 1 to get to the correct spot (I think - I haven't tested this, so take these instructions as guidance and not as gold). To center the heel turn, you just want to make sure that there are an equal number of unworked side stitches on either side of the center heel stitches after you've worked rows 1 & 2. If they're uneven, then you need to either change the number of stitches you knit on row 1 or the number of stitches you purl on row 2 to even it out. When you're done, you should have an odd number of stitches left on the heel needle. Work the gusset and foot taking the extra stripes into account (they should flow pretty easily). When you get to the toe, you'll have to deal with the eight extra stitches so end the foot part a little shorter (the extra decreases will add just under an inch in length) and divide the sts so there are an even # on each needle. You'll do a decrease round and then two even rounds just like for the toe as written, but you'll start out with a k7 instead of a k5 at the end of each needle. Then, do a k6 on the next decrease round, work two rounds even, and you'll be set to work the rest of the toe instructions as written.
If you need to make an even bigger size, you can add another eight stitches and more stripes to the sides, following the example above to deal with the extra stitches.
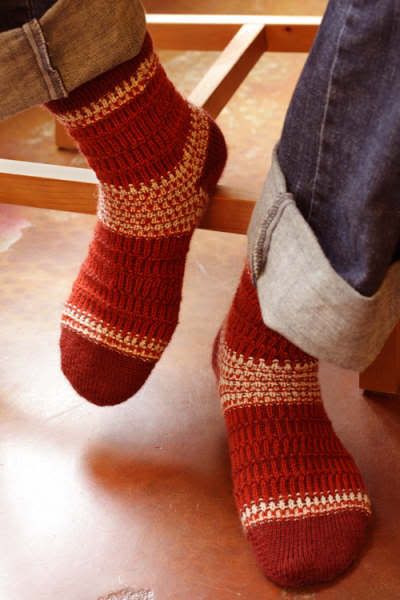
Now, for the gusset and heel flap tips. First, if you have a high instep or are having trouble getting the sock to fit over your heel, you can easily add additional rows to the heel flap. Just make sure you add them in multiples of two to make the striping pattern work out (ie 16 chain sts on each edge, 18 chain sts, etc.). When you're picking up sts along the sides of the heel, make sure you end with a MC stripe. Also, to make the join between the gusset and the instep even tidier and make the stripes line up, I picked up a couple extra stitches in the join on this sock:

As you can see, this transition is smoother than the one on the original sock pictured in the magazine. After picking up one stitch in each of the edge chain stitches, I then picked up stitches inside the loop of each of the bottom stitches of the two side stripes, keeping the colors in pattern.
This isn't actually at the gusset since I've already knit past that point, but this picture shows where to stick the needle - I'm going inside the stitch to pick up, not between the stitches like you would for a make 1.

By doing this in each of those side stripes that come down into that corner, you can make the transition nearly invisible. If you've picked up extra stitches along the heel flap, you'll simply work additional decrease rounds until you have the correct number of stitches for the sole.
The toe that I used is an adaptation of one of the toes from Nancy Bush's Knitting Vintage Socks and it kind of swirls around the toe (I thought it was a good match for the snowflake theme). A standard round toe can easily be done instead, but it won't be nearly as fun!
I hope you find these tips helpful (and if you're in the Portland area and want additional guidance, sign up for my class at Close Knit and we'll talk about all this stuff in detail as well as learning two-handed stranding for the colorwork). Happy Snowflake Sock knitting!
I'm using Louet Gems Sport in a dark purple and light grey, and it is turning out just lovely. Here it is, graciously modeled by my little plastic foot:

And the back view:

I've seen a few comments floating around from folks who want to resize the pattern to fit a larger foot. The best way to do this would be to add additional stripes on the sides of the leg. Add eight stitches to the cast-on to increase the finished foot size to 8.25" (which would be the right size for 9-9.5" feet) and then repeat the first couple stitches of the chart an additional two times on each side of the pattern. For example, right now the stripes are W-B-W (white-blue-white) on either side of the leg, and this is represented on the chart with sts 1 & 2 as B-W and stitch 28 as W. You'd modify so that the stripes would be W-B-W-B-W-B-W on either side of the leg so the chart would change to cover 32 sts and you'd knit sts 1-4 as B-W-B-W, work sts 3-27 of the chart as written over sts 5-29 on the needles, then work W-B-W at the end.
When you get to the heel, you'd work it over 33 sts. When turning the heel, k17 on Row 1 to get to the correct spot (I think - I haven't tested this, so take these instructions as guidance and not as gold). To center the heel turn, you just want to make sure that there are an equal number of unworked side stitches on either side of the center heel stitches after you've worked rows 1 & 2. If they're uneven, then you need to either change the number of stitches you knit on row 1 or the number of stitches you purl on row 2 to even it out. When you're done, you should have an odd number of stitches left on the heel needle. Work the gusset and foot taking the extra stripes into account (they should flow pretty easily). When you get to the toe, you'll have to deal with the eight extra stitches so end the foot part a little shorter (the extra decreases will add just under an inch in length) and divide the sts so there are an even # on each needle. You'll do a decrease round and then two even rounds just like for the toe as written, but you'll start out with a k7 instead of a k5 at the end of each needle. Then, do a k6 on the next decrease round, work two rounds even, and you'll be set to work the rest of the toe instructions as written.
If you need to make an even bigger size, you can add another eight stitches and more stripes to the sides, following the example above to deal with the extra stitches.
Now, for the gusset and heel flap tips. First, if you have a high instep or are having trouble getting the sock to fit over your heel, you can easily add additional rows to the heel flap. Just make sure you add them in multiples of two to make the striping pattern work out (ie 16 chain sts on each edge, 18 chain sts, etc.). When you're picking up sts along the sides of the heel, make sure you end with a MC stripe. Also, to make the join between the gusset and the instep even tidier and make the stripes line up, I picked up a couple extra stitches in the join on this sock:

As you can see, this transition is smoother than the one on the original sock pictured in the magazine. After picking up one stitch in each of the edge chain stitches, I then picked up stitches inside the loop of each of the bottom stitches of the two side stripes, keeping the colors in pattern.
This isn't actually at the gusset since I've already knit past that point, but this picture shows where to stick the needle - I'm going inside the stitch to pick up, not between the stitches like you would for a make 1.

By doing this in each of those side stripes that come down into that corner, you can make the transition nearly invisible. If you've picked up extra stitches along the heel flap, you'll simply work additional decrease rounds until you have the correct number of stitches for the sole.
The toe that I used is an adaptation of one of the toes from Nancy Bush's Knitting Vintage Socks and it kind of swirls around the toe (I thought it was a good match for the snowflake theme). A standard round toe can easily be done instead, but it won't be nearly as fun!
I hope you find these tips helpful (and if you're in the Portland area and want additional guidance, sign up for my class at Close Knit and we'll talk about all this stuff in detail as well as learning two-handed stranding for the colorwork). Happy Snowflake Sock knitting!
posted by knittinmom at 10:58 AM
![]()
![]()


5 Comments:
Love the socks in those colors!
That is gorgeous!
Thanks, Chrissy. I'll give it a try! I just cast on today in green and white.
Beautiful sock!
Thanks so much for writing up these instructions! I just started these and I was worried they were going to be too small. Now I'll just unravel and start over with the additional stitches.
Post a Comment
<< Home